Efficient PX Graphics in Niagara
Introduction
In my position, I often end up replacing or finishing PX graphics made by other contractors. While style is certainly subjective, there are almost always some very large mistakes I see being made regarding the scalability/reusability of these graphics, specifically. PX files end up commonly copied/pasted just to use absolute ords on each binding and opportunities for reusable includes are missed. As a result of the amount of manual work being done, there are often constant misspellings and typos. There are countless best practices and tricks to creating and maintaining graphics more easily within Niagara, and we’re going to go over some of the most useful ones today!
Requirements
PX graphics are very adaptable, and you can make them fit any station. However, everything I’ll say in this guide will be working with a few assumptions about your station. The biggest, and most important, is that you have consistent point naming. Re-using any PX files will require that each device of a similar type has the same point names for the same data, for example, HTG_O for your heating valve actuator command, and SF_C for your supply fan command. If your data model isn’t consistent, scalability becomes a major problem, for far more than just PX graphics.
It’s also important to keep a consistent file structure. This is easier to work around than inconsistent naming, but if one AHU has all points directly under the device’s “points” folder, and another has subfolders under “points” for “outputs”, “inputs”, and “setpoints”, that inconsistency will also cause problems. Similarly to point naming, this can also limit you in other ways, such as making you unable to filter a BQL query with something like “where parent.parent.name like ‘AHU*‘“.
Ord Relativization
To start, let’s take a look at our station. To keep things simple and quick, all we have are some reheat coils, with Zone Temp, Zone Temp Setpoint, and Heating Valve Output, with each coil in a separate folder. We also have a Discharge Air Temp Sensor in some reheats, but not all. Below is a screenshot of our station:
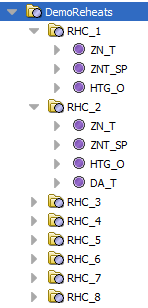
Most commonly, when someone is new to Niagara, I see them binding ords in PX files by just copying the absolute ord (station:|slot:/DemoReheats/RHC_1/ZN_T, in this case) and pasting it into the binding. They then do all linking to direct PX files in the file tree of the station. This, however, is incredibly inefficient. Niagara allows you to tie PX graphics to folders directly, and in doing so, provides several tricks to re-use files. To start, we want to right-click one of our device folders (RHC_1, to start) and choose “new view”. This gives the following window:
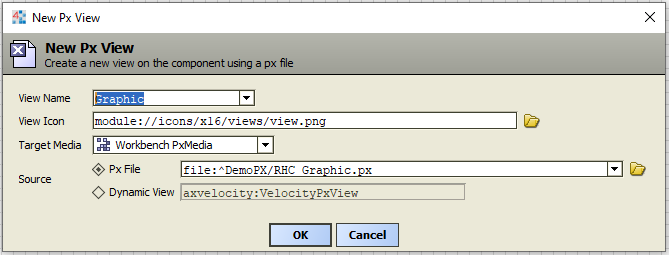
You point to an existing file in the Source→Px File option, but you can also point to one that doesn’t exist, and Niagara will create a blank graphic for you to work with. After this view is added, the default view of this folder will no longer be the property sheet, but our graphic. First, let's set up our Zone Temp binding! This should mostly be familiar, but here, we’re going to use a relativized ord. If you bind to “slot:” on a PX graphic, it is functionally identical to binding directly to the folder we are viewing. Continuing to build out our ord from here will specify slots under the current folder. Below is our configuration for Zone Temp’s value label:
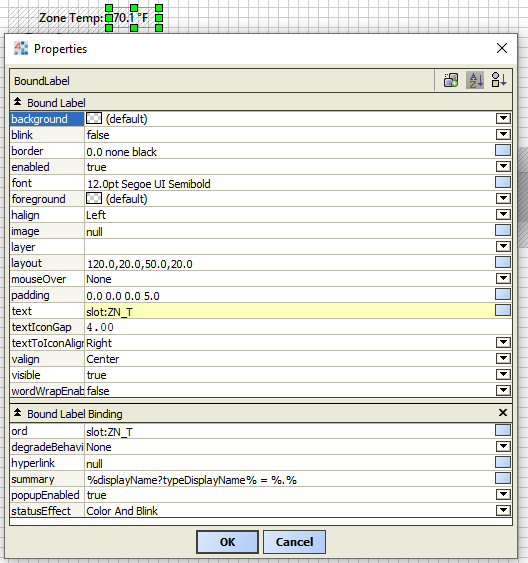
Now, this label will hold the correct Zone Temp on every folder, and allow us to re-use our PX file across all RHC_X folders!
PX Object Degradation
One thing you may have noticed is that not all folders have the same points; We have a Discharge Air Temp in some reheats, but not all! Often, even when a contractor knows how to relative ords, they would split this into 2 different PX files, which can be harder to maintain. If you update to a newer graphical standard, for example, this means you have to make these changes twice! Luckily, there are also a few tricks to get around this limitation. To start, we’re assuming you’ve already added a discharge probe graphic and label to our existing graphic, and you’re viewing it from RHC_2’s folder.
In label bindings, there is a property called “degradeBehavior”. This will determine how an object in a PX graphic responds if the ord is unresolved. This option is what we’ll use to hide our discharge probe graphic and labels when they don’t exist. To start, we need to add some bindings that aren’t used for animation. We should already have our binding on the value label for Discharge Temp, but we need to add the same binding to the probe graphic and Discharge Temp label as well. To add a binding, you just have to click the icon circled below, and then choose “kitPx:Bound Label Binding” in the resulting popup:
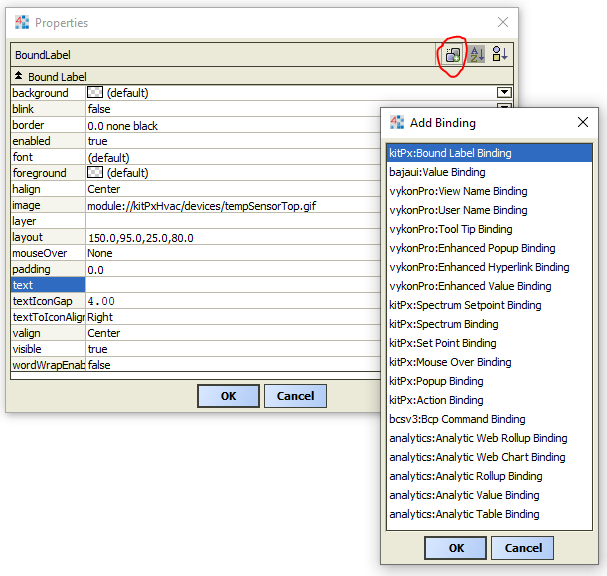
This gives us the same binding as we get on Bound Labels, so all we need to do is add our “slot:DA_T” ord, then in degradeBehavior, just choose “Hide”. After making this change, we can view RHC_1 and RHC_2 using the same graphic, but Niagara hides our Discharge Temp info if it doesn’t exist.
This works very reliably, but one thing to point out is that if an object is hiding on degrade, it’s tough to select in the PX editor. Ideally, you want to edit this graphic on devices that have all possible points, but in a pinch, you can drag a box over where the hidden objects are placed, and edit them that way.
Bulk-Adding PX Views
Now that we have our graphic built and ready to go, we want to add the view to every RHC folder. This can be done manually, but the Batch Editor allows us to add these views to all applicable folders at once. I made a more in-depth Batch Editor guide previously, and I will link to it down below, but I’m covering it here because there are some specific quirks to using the Batch Editor to add views specifically that I want to cover.
As usual, we want to select all of our target folders, in this case, all RHC folders, and we want to use the “Add Slot” action in Batch Editor. Our specific type is baja:PxView. Below is the configuration I’m using here:
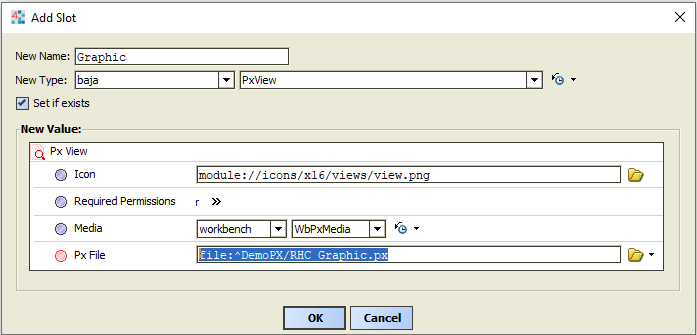
We already have this view on two of our reheats, but since we’re using the same slot name and checking “Set if exists”, it doesn’t hurt to apply this action to all RHC folders. Now, at first glance, it appears to already be done, but this lack of clarity is why I’m documenting this process specifically. If you were to log in with a non-admin account, these graphics actually wouldn’t show up! The screenshot below shows why this is the case:

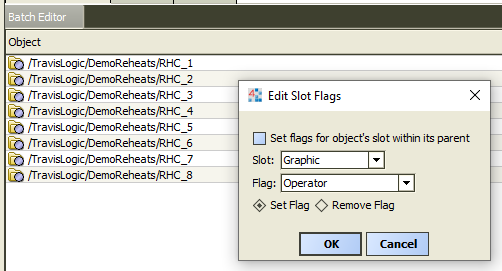
The Graphic slot we just added was added with no slot flags; Graphics aren’t visible to non-admin users without the “Operator” flag checked. Luckily, this is easy to remedy with the Batch Editor. With our same list of all RHC folders still in place, we can choose “Edit Slot Flags” and add this operator flag to our new baja:PxView slots. Below is a screenshot of what we’ll set in the Batch Editor to make this fix.
PX Includes
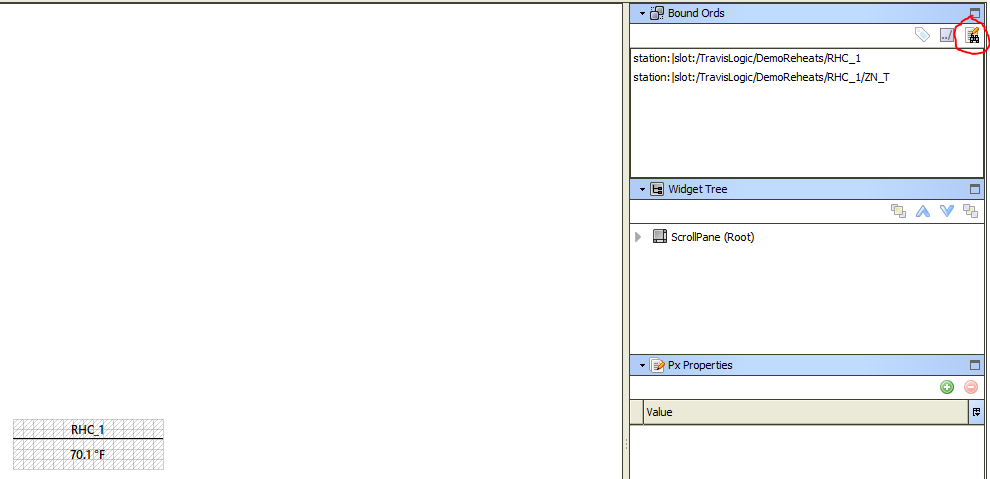
The final important thing I see contractors regularly miss is the usage of PX Includes. These allow you to reuse small PX files to tie data to multiple different folders. We’re going to make an include that will show some of our RHC name and current Zone Temp, as well as provide a link to the RHC graphics we just made. First, we need a blank graphic on our parent folder “DemoReheats”, and we also need to make a new PX file to serve as our include. We then want to start as normal and build a small graphic with absolute ords. Once we have that built, we’ll do a bulk ord search+replace by clicking the button circled below:
We’ll want to populate the search and replace dialog box with the following:
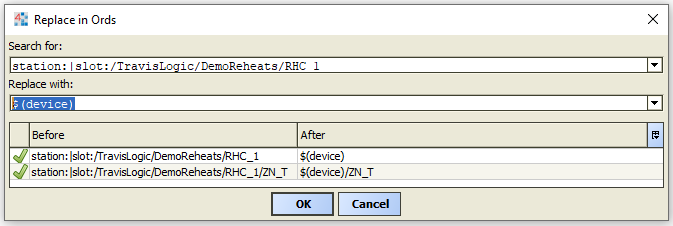
Our resulting ords look a little strange, but it will make more sense in a moment! For now, just remember that we are replacing the ord to the device with $(device) (Technically any string inside of the $() will work). Save this change, and the graphic should lose all data in the direct PX file view. This is expected! This ord is invalid outside of properly deployed includes. To deploy this, we’ll want to go to our overview graphic, select all of our RHC folders, and drag them out onto the PX file. This will give the following popup, which I’ve filled out:
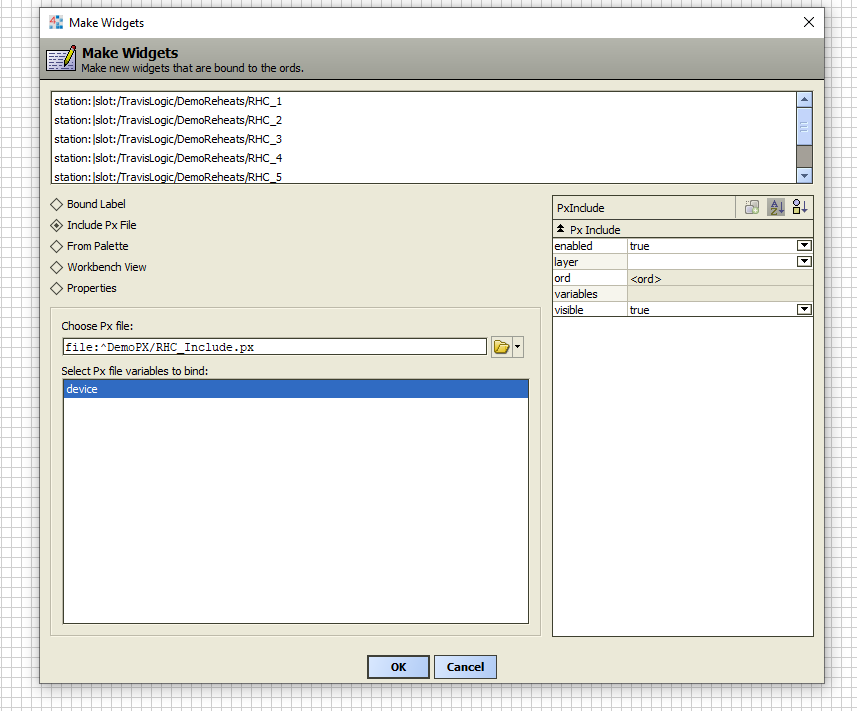
Make sure to select “device” under our PX file variables; This can be easy to forget, but Niagara won’t properly populate our PX includes if we do! We end up with a series of PX objects populated with basic data, as well as links to the individual graphics if we made sure to add a blank label over top, with a bound label binding and $(device) in our hyperlink slot. Below is how this will look in the end:
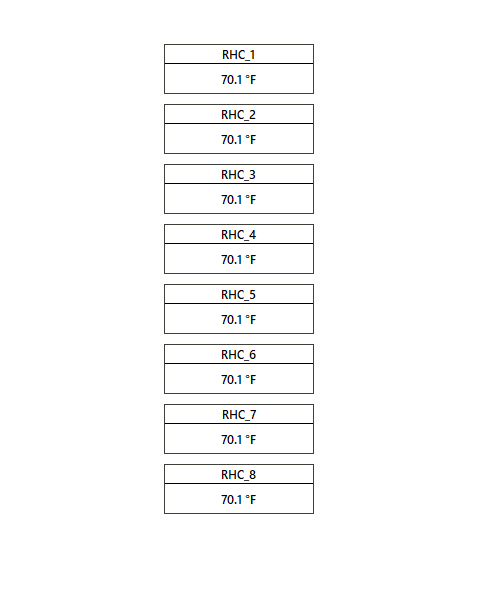
Obviously, this is quite ugly, but fortunately, this is a technical guide and not a graphic design guide!
Additional Resources
As always, you can use ctrl+L inside of Niagara and paste in the following documentation ords to view them.
PxInclude Widget: module://docGraphics/doc/AboutthePxIncludeW..
PX Data Binding: module://docGraphics/doc/aBindingTypes.html